
 叶子夜梓
叶子夜梓
1.总览
留言的展示参考网络上参见的格式,如掘金社区:
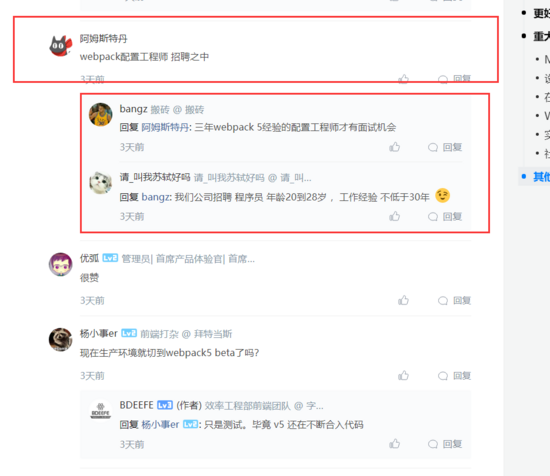
一共分为两层,子孙留言都在第二层中
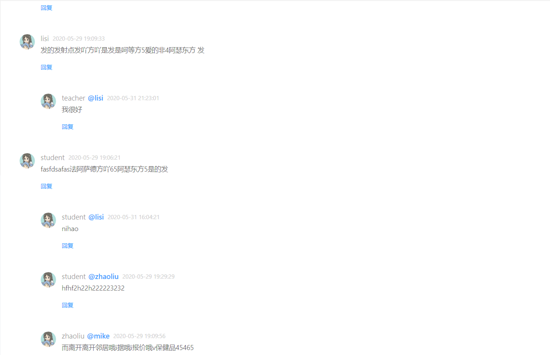
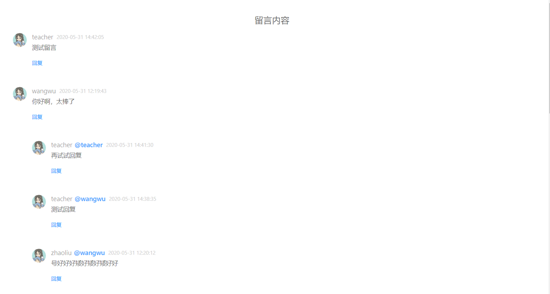
最终效果如下:
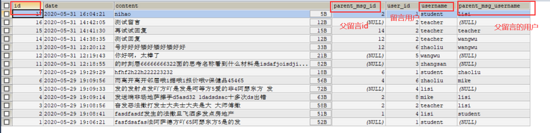
接下是数据库的表结构,如下所示:
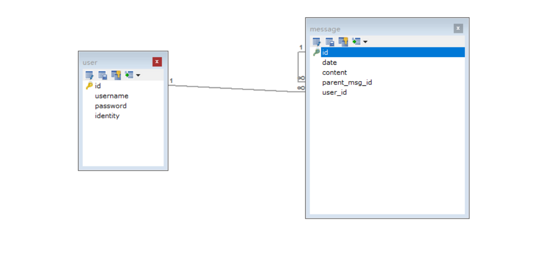
有一张user表和留言表,关系为一对多,留言表有父留言字段的id,和自身有一个一对多的关系,建表语句如下:
create table `message` (
 `id` int not null auto_increment,
 `date` datetime not null default current_timestamp,
 `content` text not null,
 `parent_msg_id` int default null,
 `user_id` int not null,
 primary key (`id`),
 key `user_id` (`user_id`),
 key `message_ibfk_1` (`parent_msg_id`),
 constraint `message_ibfk_1` foreign key (`parent_msg_id`) references `message` (`id`) on delete cascade on update cascade,
 constraint `message_ibfk_2` foreign key (`user_id`) references `user` (`id`) on delete cascade on update cascade
) engine=innodb auto_increment=18 default charset=utf-8


create table `user` (
 `id` int not null auto_increment,
 `username` varchar(255) not null,
 `password` varchar(255) not null,
 `identity` varchar(20) character set utf8 collate utf8_general_ci not null,
 primary key (`id`),
 unique key `username` (`username`)
) engine=innodb auto_increment=10 default charset=utf-8
2.后台接口
2.1获取留言接口
在django的views.py中定义两个接口,一个负责提供留言内容,一个负责插入留言,如下:
# 获取留言信息
@require_http_methods(['get'])
def findallmsg(request):
  response = {}
  try:
    sql = '''
    select
    msg1.*,
    user.username,
    msg2.username as parent_msg_username
    from message msg1
    left join
    (select
    m.id,
    user.username
    from message m
    left join user
    on m.user_id = user.id
    )as msg2
    on msg1.parent_msg_id = msg2.id
    left join user
    on msg1.user_id = user.id
    order by msg1.date desc;
    '''
    with connection.cursor() as cursor:
      cursor.execute(sql)
      response['messages'] = sortmsg(cursor)
    response['status_code'] = 200
  except exception as e:
    response['status_code'] = 500
    response['error'] = e

  return jsonresponse(response)
先来看看这个sql能查出些什么东西:
上面接口中的sormsg()函数用于整理留言信息,使子留言和父留言能对应起来,算法实现如下:
# 整理留言信息返回格式
def sortmsg(cursor):
  list = []
  allmsg = dictfetchall(cursor)
  for i in range(len(allmsg)):
    tmpparent = allmsg[i]
    tmpchild = []
    # 如果没有属于根评论,则搜索该评论下的所有子评论
    if tmpparent.get('parent_msg_id') == none:
      tmpchild = bfs(tmpparent, allmsg)
    # 如果是子评论则跳过,子评论最终会出现在根评论的子节点中
    else:
      continue
    tmpparent['children'] = tmpchild
    # 格式化时间
    tmpparent['date'] = datetime.datetime.strftime(tmpparent['date'], '%y-%m-%d %h:%m:%s')
    list.append(tmpparent)
  return list

# 搜索一条留言的所有子留言,广度优先
import queue
def bfs(parent, allmsg):
  childrenlist = []
  q = queue.queue()
  q.put(parent)
  while(not q.empty()):
    tmpchild = q.get()
    for i in range(len(allmsg)):
      if allmsg[i]['parent_msg_id'] is not none and allmsg[i]['parent_msg_id'] == tmpchild['id']:
        childrenlist.append(allmsg[i])
        q.put(allmsg[i])
  # 子留言列表按时间降序排序
  childrenlist = sorted(childrenlist, key = lambda d: d['date'], reverse = true)
  # 格式化日期格式
  for item in childrenlist:
    item['date'] = datetime.datetime.strftime(item['date'], '%y-%m-%d %h:%m:%s')
  return childrenlist
用postman测试接口,得到的json格式如下:
{
  "messages": [
    {
      "id": 12,
      "date": "2020-05-31 12:19:43",
      "content": "你好啊,太棒了",
      "parent_msg_id": null,
      "user_id": 5,
      "username": "wangwu",
      "parent_msg_username": null,
      "children": []
    },
    {
      "id": 11,
      "date": "2020-05-31 12:18:55",
      "content": "的时刻层6666666632\n2面的思考名称看到什么材料是isdafjoisdjiojildsc",
      "parent_msg_id": null,
      "user_id": 3,
      "username": "zhangsan",
      "parent_msg_username": null,
      "children": []
    },
    {
      "id": 5,
      "date": "2020-05-29 19:09:33",
      "content": "发的发射点发吖方吖是发是呵等方5爱的非4阿瑟东方 发",
      "parent_msg_id": null,
      "user_id": 4,
      "username": "lisi",
      "parent_msg_username": null,
      "children": [
        {
          "id": 13,
          "date": "2020-05-31 12:20:12",
          "content": "号好好好矮好矮好矮好好",
          "parent_msg_id": 5,
          "user_id": 6,
          "username": "zhaoliu",
          "parent_msg_username": "lisi"
        }
      ]
    },
    {
      "id": 1,
      "date": "2020-05-29 19:06:21",
      "content": "fasfdsafas法阿萨德方吖65阿瑟东方5是的发",
      "parent_msg_id": null,
      "user_id": 1,
      "username": "student",
      "parent_msg_username": null,
      "children": [
        {
          "id": 7,
          "date": "2020-05-29 19:29:29",
          "content": "hfhf2h22h222223232",
          "parent_msg_id": 6,
          "user_id": 1,
          "username": "student",
          "parent_msg_username": "zhaoliu"
        },
        {
          "id": 6,
          "date": "2020-05-29 19:09:56",
          "content": "而离开离开邻居哦i据哦i报价哦v保健品45465",
          "parent_msg_id": 4,
          "user_id": 6,
          "username": "zhaoliu",
          "parent_msg_username": "mike"
        },
        {
          "id": 4,
          "date": "2020-05-29 19:09:14",
          "content": "发送端非场地萨擦手d5asd32 1dads\r\ndsac十多次ds出错",
          "parent_msg_id": 2,
          "user_id": 8,
          "username": "mike",
          "parent_msg_username": "lisi"
        },
        {
          "id": 3,
          "date": "2020-05-29 19:08:56",
          "content": "奋发恶法撒打发士大夫士大夫是大 大师傅撒",
          "parent_msg_id": 2,
          "user_id": 2,
          "username": "teacher",
          "parent_msg_username": "lisi"
        },
        {
          "id": 2,
          "date": "2020-05-29 19:08:41",
          "content": "fasdfasdf发生的法撒旦飞洒多发点房地产",
          "parent_msg_id": 1,
          "user_id": 4,
          "username": "lisi",
          "parent_msg_username": "student"
        }
      ]
    }
  ],
  "status_code": 200
}
这个就是前台所要的内容了。
其实一开始我是很直观地认为是用深度优先来取出层层嵌套的留言的,如下:
# 递归搜索一条留言的所有子留言,深度优先
def dfs(parent, allmsg):
  childrenlist = []
  for i in range(len(allmsg)):
    if allmsg[i]['parent_msg_id'] is not none and allmsg[i]['parent_msg_id'] == parent['id']:
      allmsg[i]['children'] = dfs(allmsg[i], allmsg)
      childrenlist.append(allmsg[i])
  return childrenlist
这样取出的json格式是这样的:
{
  "messages": [
    {
      "id": 5,
      "date": "2020-05-29 19:09:33",
      "content": "发的发射点发吖方吖是发是呵等方5爱的非4阿瑟东方 发",
      "parent_msg_id": null,
      "user_id": 4,
      "username": "lisi",
      "children": [
        {
          "id": 8,
          "date": "2020-05-29t17:23:37",
          "content": "哈哈哈哈哈哈哈哈哈哈哈哈哈哈哈哈哈呵呵呵呵呵呵",
          "parent_msg_id": 5,
          "user_id": 3,
          "username": "zhangsan",
          "children": []
        }
      ]
    },
    {
      "id": 1,
      "date": "2020-05-29 19:06:21",
      "content": "fasfdsafas法阿萨德方吖65阿瑟东方5是的发",
      "parent_msg_id": null,
      "user_id": 1,
      "username": "student",
      "children": [
        {
          "id": 2,
          "date": "2020-05-29t19:08:41",
          "content": "fasdfasdf发生的法撒旦飞洒多发点房地产",
          "parent_msg_id": 1,
          "user_id": 4,
          "username": "lisi",
          "children": [
            {
              "id": 4,
              "date": "2020-05-29t19:09:14",
              "content": "发送端非场地萨擦手d5asd32 1dads\r\ndsac十多次ds出错",
              "parent_msg_id": 2,
              "user_id": 8,
              "username": "mike",
              "children": [
                {
                  "id": 6,
                  "date": "2020-05-29t19:09:56",
                  "content": "而离开离开邻居哦i据哦i报价哦v保健品45465",
                  "parent_msg_id": 4,
                  "user_id": 6,
                  "username": "zhaoliu",
                  "children": [
                    {
                      "id": 7,
                      "date": "2020-05-29t19:29:29",
                      "content": "hfhf2h22h222223232",
                      "parent_msg_id": 6,
                      "user_id": 1,
                      "username": "student",
                      "children": []
                    }
                  ]
                }
              ]
            },
            {
              "id": 3,
              "date": "2020-05-29t19:08:56",
              "content": "奋发恶法撒打发士大夫士大夫是大 大师傅撒",
              "parent_msg_id": 2,
              "user_id": 2,
              "username": "teacher",
              "children": []
            },
            {
              "id": 9,
              "date": "2020-05-29t17:27:13",
              "content": "alalla啦啦啦啦啦啦来的队列李大水泛滥的萨拉发 的  第三方哈l",
              "parent_msg_id": 2,
              "user_id": 7,
              "username": "joke",
              "children": []
            }
          ]
        }
      ]
    }
  ],
  "status_code": 200
}
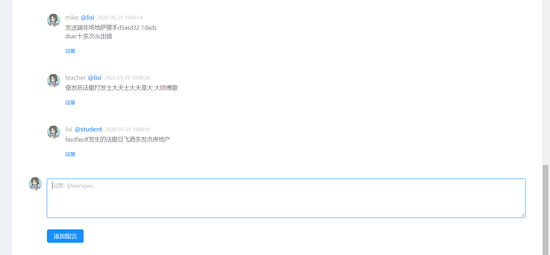
但仔细一想,实际页面展示的时候肯定不能这样一层层无限地嵌套下去,否则留言多了页面就装不下了,于是还是改成了两层留言的格式,第二层使用广度优先搜索将树转为列表存储。
2.2 新增留言接口
前台提供留言内容、留言者id以及父留言的id(如果不是回复信息的话就是空)
import datetime

@require_http_methods(['post'])
def insertmsg(request):
  response = {}
  try:
    request.post = request.post.copy()
    request.post['date'] = datetime.datetime.now()
    msg = message()
    msg.date = request.post.get('date')
    msg.content = request.post.get('content')
    msg.parent_msg_id = request.post.get('parent_msg_id')
    msg.user_id = request.post.get('user_id')
    msg.save()
    response['msg'] = 'success'
    response['status_code'] = 200
  except exception as e:
    response['error'] = str(e)
    response['status_code'] = 500

  return jsonresponse(response)
3.前台设计
有了后台提供的数据,前台展示就比较简单了。
留言板块的设计我使用了ant design的留言组件。
留言界面主要由两个组件所构成——留言区组件以及评论表单的组件
3.1主视图messeage.vue
<template>
 <div>
  <comment-message @handlereply="handlereply" :commentlist="comments"></comment-message>
  <comment-area @reload="reload" :parentmsgid="replymsgid" :replymsgusername="replymsgusername"></comment-area>
 </div>
</template>

<script>
import commentmessage from "components/common/comment/commentmessage";
import commentarea from "components/common/comment/commentarea";

import { findallmsg } from "network/ajax";

export default {
 name: "message",
 components: {
  commentmessage,
  commentarea
 },
 data() {
  return {
   comments: [],
   replymsgid: "",
   replymsgusername: ""
  };
 },
 mounted() {
  findallmsg()
   .then(res => {
    this.comments = res.data.messages;
   })
   .catch(err => {
    console.log(err);
    this.$router.push("/500");
   });
 },
 methods: {
  handlereply(data) {
   this.replymsgid = data.msgid;
   this.replymsgusername = data.msgusername;
  },
  reload() {
   this.$emit("reload")
  }
 }
};
</script>

<style>
</style>
3.2 留言区域组件commentmessage.vue:
<template>
 <div id="commentmsg">
  <div v-if="isempty(commentlist)" class="head-message">暂无留言内容</div>
  <div v-else class="head-message">留言内容</div>
  <comment
   @handlereply="handlereply"
   v-for="(item1, index) in commentlist"
   :key="'parent-' + index"
   :comment="item1"
  >
   <!-- 二层留言 -->
   <template #childcomment v-if="!isempty(item1.children)">
    <comment
     v-for="(item2, index) in item1.children"
     :key="'children-' + index"
     :comment="item2"
     @handlereply="handlereply"
    ></comment>
   </template>
  </comment>
 </div>
</template>

<script>
import comment from "./comment";
import vue from "vue";

export default {
 name: "commentmessage",
 components: {
  comment
 },
 props: {
  commentlist: {
   type: array,
   default: []
  }
 },
 methods: {
  isempty(ls) {
   return ls.length === 0;
  },
  handlereply(data) {
   this.$emit("handlereply", {
    msgid: data.msgid,
    msgusername: data.msgusername
   });
  }
 }
};
</script>

<style scoped>
.head-message {
 font-size: 20px;
 text-align: center;
}
</style>
3.3 留言区域由多个comment留言组件所构成,留言组件定义如下
<template>
 <a-comment>
  <span
   slot="actions"
   key="comment-basic-reply-to"
   @click="handlreply(comment.id, comment.username)"
  >
   <a >回复</a>
  </span>
  <a slot="author" style="font-size: 15px">{{comment.username}}</a>
  <a
   v-if="comment.parent_msg_username"
   slot="author"
   class="reply-to"
  >@{{comment.parent_msg_username}}</a>
  <a-avatar slot="avatar" :src="require('assets/images/login_logo.png')" alt />
  <p slot="content">{{comment.content}}</p>
  <a-tooltip slot="datetime">
   <span>{{comment.date}}</span>
  </a-tooltip>
  <slot name="childcomment"></slot>
 </a-comment>
</template>

<script>
export default {
 name: "comment",
 props: {
  comment: ""
 },
 methods: {
  handlreply(msgid, msgusername) {
   this.$emit("handlereply", { msgid, msgusername });
  }
 }
};
</script>

<style scoped>
.reply-to {
 padding-left: 5px;
 color: #409eff;
 font-weight: 500;
 font-size: 15px;
}
</style>
3.4 添加留言或回复的表单组件commentarea.vue
<template>
 <div>
  <a-comment id="comment-area">
   <a-avatar slot="avatar" :src="require('assets/images/login_logo.png')" alt="han solo" />
   <div slot="content">
    <a-form-item>
     <a-textarea id="my-textarea" :rows="4" v-model="content" />
    </a-form-item>
    <a-form-item>
     <a-button
      html-type="submit"
      :loading="submitting"
      type="primary"
      @click="handlesubmit"
     >添加留言</a-button>
    </a-form-item>
   </div>
  </a-comment>
 </div>
</template>
<script>
import {insertmsg} from 'network/ajax.js'

export default {
 data() {
  return {
   content: "",
   submitting: false
  };
 },
 props: {
  parentmsgid: "",
  replymsgusername: ""
 },
 watch: {
  replymsgusername() {
   document
    .queryselector("#my-textarea")
    .setattribute("placeholder", "回复: " + "@" + this.replymsgusername);
  }
 },
 methods: {
  handlesubmit() {
   if (!this.content) {
    return;
   }
   this.submitting = true;
   insertmsg(this.content, this.parentmsgid, this.$store.state.userid).then(res => {
    this.submitting = false;
    this.content = "";
    document
    .queryselector("#my-textarea")
    .setattribute("placeholder", '');
    this.$emit('reload')
   }).catch(err => {
    console.log(err);
    this.$router.push('/500')
   })
  },
  handlechange(e) {
   this.value = e.target.value;
  }
 }
};
</script>
组装完成后实现的功能有:
留言界面的展示
点击回复按钮跳到留言表单(这里我直接用了a标签来锚定位,试过用scrolltoview来平滑滚动过去,但不知道为什么只有第一次点击回复按钮时才能平滑滚动到,之后再点击他就不滚动了。。。),并把被回复者的用户名显示在placeholder中
点击添加留言按钮,清空placeholder,并自动实现router-view的局部刷新(不是整页刷新)显示出新增的留言
局部刷新的实现就是通过代码中的自定义事件 reload ,具体就是从表单组件开始发送 reload 事件,其父组件 message.vue 收到后,再继续发送 reload 事件给外层的视图home.vue,home的再外层就是app.vue了,home.vue的定义如下:
<template>
 <el-container class="main-el-container">
  <!-- 侧边栏 -->
  <el-aside width="15%" class="main-el-aside">
   <side-bar></side-bar>
  </el-aside>
  <!-- 主体部分 -->
  <el-main>
   <el-main>
    <router-view @reload="reload" v-if="isrouteralive"></router-view>
   </el-main>
  </el-main>
 </el-container>
</template>

<script>
import sidebar from "components/common/sidebar/sidebar";

export default {
 name: "home",
 components: { sidebar },
 data() {
  return {
   isrouteralive: true
  };
 },
 props: {
  isreload: ""
 },
 watch: {
  isreload() {
   this.reload();
  }
 },
 methods: {
  reload() {
   this.isrouteralive = false;
   this.$nexttick(() => {
    this.isrouteralive = true;
   });
  }
 }
};
</script>

<style scoped>
.main-el-container {
 height: 750px;
 border: 1px solid #eee;
}
.main-el-aside {
 background-color: rgb(238, 241, 246);
}
</style>
里面有一个reload方法,通过改变isrouteralive来让router-view先隐藏,再显示,实现重新挂载。
到此这篇关于使用vue+django+ant design做一个留言评论模块的示例代码的文章就介绍到这了,更多相关vue+django+ant design留言评论内容请搜索以前的文章或继续浏览下面的相关文章希望大家以后多多支持!
