 奥巴驴g
奥巴驴g
没定格式的话可以再jsp页面添加这段:
<%
response.reset();
response.setContentType("application/vnd.ms-excel;charset=utf-8");
java.util.Date date = new Date();
DateFormat df = new SimpleDateFormat("yyyyMMddhhmmss");
String Starttime = df.format(date).toString();
response.setHeader("Content-disposition", "attachment; filename=GroupingInformation_"+ Starttime + ".doc");
%>
如果要定好格式的话,只有自己去看poi比较复杂。(但是用习惯了就没大问题了。)
poi后台:

导出第三句是格式,这个自己去试试。
我看网上说的poi对于word的支持不太好啊?不是很复杂的word文档,但是里面会有表格和一下描述文字
对了。。。poi后台我导出的Excel。。一般情况下用没定格式的导出word也行,怎么说呢,你加了那段话,系统就直接复制你的页面过去,所以你的页面是什么样子,基本导出就是什么样子的。。。当你跳转这个页面的时候就系统就会问你报存word文件否。。。。word导出,你的table也会出来。
如何用C#代码控制word文档目录的自动生成
实现代码如下:
public class BiultReportForm
{
/// <SUMMARY></SUMMARY>
/// word 应用对象
///
private Microsoft.Office.Interop.Word.Application _wordApplication;
/// <SUMMARY></SUMMARY>
/// word 文件对象
///
private Microsoft.Office.Interop.Word.Document _wordDocument;
/// <SUMMARY></SUMMARY>
/// 创建文档
///
public void CreateAWord()
{
//实例化word应用对象
this._wordApplication = new Microsoft.Office.Interop.Word.ApplicationClass();
Object myNothing = System.Reflection.Missing.Value;
this._wordDocument = this._wordApplication.Documents.Add(ref myNothing, ref myNothing, ref myNothing, ref myNothing);
}
/// <SUMMARY></SUMMARY>
/// 添加页眉
///
/// <PARAM name="pPageHeader" />
public void SetPageHeader(string pPageHeader)
{
//添加页眉
this._wordApplication.ActiveWindow.View.Type =Microsoft .Office .Interop .Word.WdViewType.wdOutlineView;
this._wordApplication.ActiveWindow.View.SeekView = Microsoft.Office.Interop.Word.WdSeekView.wdSeekPrimaryHeader;
this._wordApplication.ActiveWindow.ActivePane.Selection.InsertAfter(pPageHeader);
//设置中间对齐
this._wordApplication.Selection.ParagraphFormat.Alignment =Microsoft .Office .Interop.Word.WdParagraphAlignment.wdAlignParagraphCenter;
//跳出页眉设置
this._wordApplication.ActiveWindow.View.SeekView = Microsoft.Office.Interop.Word.WdSeekView.wdSeekMainDocument;
}
/// <SUMMARY></SUMMARY>
/// 插入文字
///
/// <PARAM name="pText" />文本信息
/// <PARAM name="pFontSize" />字体打小
/// <PARAM name="pFontColor" />字体颜色
/// <PARAM name="pFontBold" />字体粗体
/// <PARAM name="ptextAlignment" />方向
public void InsertText(string pText, int pFontSize, Microsoft.Office.Interop.Word.WdColor pFontColor, int pFontBold, Microsoft.Office.Interop.Word.WdParagraphAlignment ptextAlignment)
{
//设置字体样式以及方向
this._wordApplication.Application.Selection.Font.Size = pFontSize;
this._wordApplication.Application.Selection.Font.Bold = pFontBold;
this._wordApplication.Application.Selection.Font.Color= pFontColor;
this._wordApplication.Application.Selection.ParagraphFormat.Alignment = ptextAlignment;
this._wordApplication.Application.Selection.TypeText(pText);
}
/// <SUMMARY></SUMMARY>
/// 换行
///
public void NewLine()
{
//换行
this._wordApplication.Application.Selection.TypeParagraph();
}
/// <SUMMARY></SUMMARY>
/// 插入一个图片
///
/// <PARAM name="pPictureFileName" />
public void InsertPicture(string pPictureFileName)
{
object myNothing = System.Reflection.Missing.Value;
//图片居中显示
this._wordApplication.Selection.ParagraphFormat.Alignment = Microsoft.Office.Interop.Word.WdParagraphAlignment.wdAlignParagraphCenter;
this._wordApplication.Application.Selection.InlineShapes.AddPicture(pPictureFileName, ref myNothing, ref myNothing, ref myNothing);
word 怎么生成目录,怎么用域生成目录
生成目录:插入 → 引用 → 索引和目录 → 目录域生成目录:插入 → 域 → 类别:TOC当然,不管用什么方法来生成目录,其共同的必要前提条件是,文档中的各级标题必须应用了相应级别的样式。
VBA生成Word文件和PPT文件的代码是?
Dim pptApp As PowerPoint.Application
Dim PPPres As PowerPoint.Presentation '演示文稿。
Dim PPSlide As PowerPoint.Slide '幻灯片1。==Slide对象代表幻灯片。
Shell "Regsvr32.exe /u /s " & VBA.Chr(34) & "C:\Program Files\Common Files\System\ado\msado15.dll" & VBA.Chr(34), vbHide '注册:解决实时错误429 activeX 部件不能创建对象:
Set pptApp = CreateObject("Powerpoint.Application") '创建powerpoint对象 ’实时错误 429 Active 不能创建对象
'Set pptApp = New PowerPoint.Application
'pptApp.Activate 'powerpoint对象被激活。
pptApp.Visible = True '使得ppt可见
pptApp.WindowState = PowerPoint.PpWindowState.ppWindowMaximized '最大化powerpoint窗口
' Set PPPres = pptApp.Presentations.Open(App.Path & "\AA.PPT", , , True) '打开选中的PowerPoint文档
Set PPPres = pptApp.Presentations.Add(WithWindow:=True) '添加一个新的演示文稿,并显示
pptApp.Caption = "MW Interference Check"
PPPres.BuiltInDocumentProperties("Subject") = "ZTE-MW" '主题
PPPres.BuiltInDocumentProperties("Author") = "ZTE-WSQ" '作者 替代了ppPres.Author = "WSQ" '作者名称
'ppPres.BuiltinDocumentProperties.Item("author").Value = "ZE_ZX"
PPPres.BuiltInDocumentProperties("Title") = "111"
PPPres.BuiltInDocumentProperties("Company") = "XiAn ZTE of China" '公司
PPPres.BuiltInDocumentProperties("Comments") = " Use only for ZTE" '备注,6个空格,以便对齐
PPPres.BuiltInDocumentProperties("Keywords") = "Do't copy" '关键字
PPPres.BuiltInDocumentProperties("Template") = "ZE ppt Template" '模板
PPPres.BuiltInDocumentProperties("Revision Number") = "155" '修订版本号
PPPres.BuiltInDocumentProperties("Application Name") = "AntHeightCheck.EXE" '应用程序名
PPPres.BuiltInDocumentProperties("Manager") = "ZE" '管理器
PPPres.BuiltInDocumentProperties("Category") = "1 " '类别
PPPres.BuiltInDocumentProperties("Format") = "Good" '演示文稿格式
PPPres.BuiltInDocumentProperties("Creation Date") = "2010-02-28 02:28"
PPPres.BuiltInDocumentProperties("Last Author") = "ZTE WSQ"
PPPres.BuiltInDocumentProperties("Last Print Date") = "2010-09-28 02:28"
PPPres.BuiltInDocumentProperties("Last Save Time") = "2010-09-28 02:28"
PPPres.BuiltInDocumentProperties("Total Editing Time") = "15" '编辑时间总计
PPPres.BuiltInDocumentProperties("Number of Pages") = "3" '页数
PPPres.BuiltInDocumentProperties("Number of Words") = "500" '字数
PPPres.BuiltInDocumentProperties("Number of Characters") = "28"
PPPres.BuiltInDocumentProperties("Security") = "201"
PPPres.BuiltInDocumentProperties("Number of Bytes") = "6060" '字节数
PPPres.BuiltInDocumentProperties("Number of Lines") = "100" '行数
PPPres.BuiltInDocumentProperties("Number of Paragraphs") = "100" '段落数
PPPres.BuiltInDocumentProperties("Number of Slides") = "1999" '幻灯片
PPPres.BuiltInDocumentProperties("Number of Notes") = "505" '备注
PPPres.BuiltInDocumentProperties("Number of Hidden Slides") = "101" '隐藏幻灯片
PPPres.BuiltInDocumentProperties("Number of Multimedia Clips") = "103" '多媒体剪辑
PPPres.BuiltInDocumentProperties("Last Print Date") = "1900-1-1" '必须为日期格式且不能为空,下同
'PPPres.BuiltInDocumentProperties("Hyperlink Base") = "@ZTE.CON.CN"
PPPres.BuiltInDocumentProperties("Number of Characters (with spaces)") = "9999" '字符(空格)数目
'==============以下为第1个幻灯片,首页及其标题===================================
Set PPSlide = PPPres.Slides.Add(PPPres.Slides.Count + 1, PowerPoint.PpSlideLayout.ppLayoutTitleOnly) 'Add a new slide.'添加一个新的幻灯片==只有标题 Layout:=ppLayoutBlank ppLayoutBlank
PPSlide.Shapes(PPSlide.Shapes.Count).TextFrame.TextRange.Text = "MW Interference Check" 'Add some text.标题文本
PPSlide.Shapes(PPSlide.Shapes.Count).TextFrame.TextRange.ParagraphFormat.Alignment = ppAlignCenter
PPSlide.Shapes(PPSlide.Shapes.Count).Left = 166
PPSlide.Shapes(PPSlide.Shapes.Count).Top = 105
PPSlide.Shapes(PPSlide.Shapes.Count).Height = 43
PPSlide.Shapes(PPSlide.Shapes.Count).width = 384
PPSlide.Shapes(PPSlide.Shapes.Count).TextFrame.TextRange.Font.Name = "宋体"
PPSlide.Shapes(PPSlide.Shapes.Count).TextFrame.TextRange.Font.size = 34
PPSlide.Shapes(PPSlide.Shapes.Count).TextFrame.TextRange.Font.Bold = True
PPSlide.Shapes(PPSlide.Shapes.Count).TextFrame.TextRange.Font.Color = vbRed
PPSlide.Shapes(PPSlide.Shapes.Count).TextFrame.TextRange.Font.Shadow = True
PPSlide.Shapes(PPSlide.Shapes.Count).Line.BackColor.RGB = RGB(0, 0, 0)
PPSlide.Shapes(PPSlide.Shapes.Count).Line.ForeColor.RGB = RGB(255, 255, 0)
PPSlide.Shapes(PPSlide.Shapes.Count).Line.Weight = 2
PPSlide.Shapes(PPSlide.Shapes.Count).Fill.BackColor.RGB = RGB(0, 0, 255)
PPSlide.Shapes(PPSlide.Shapes.Count).Fill.ForeColor.RGB = RGB(255, 255, 255)
PPSlide.Shapes(PPSlide.Shapes.Count).Fill.TwoColorGradient msoGradientFromCenter, 1 'PPSlide.Shapes.Range(PPSlide.Shapes.Count).Fill.PresetGradient msoGradientHorizontal, 1, 20 'Range填充==很好
'==============以下为两竖线虚线=============================================
PPSlide.Shapes.AddLine 5, 17, 5, 507
PPSlide.Shapes(PPSlide.Shapes.Count).Line.DashStyle = 2 '1实线2虚线
PPSlide.Shapes(PPSlide.Shapes.Count).Line.Weight = 10
PPSlide.Shapes(PPSlide.Shapes.Count).Line.ForeColor.RGB = RGB(0, 255, 0)
PPSlide.Shapes.AddLine 715, 17, 715, 507
PPSlide.Shapes(PPSlide.Shapes.Count).Line.DashStyle = 2 '1实线2虚线
PPSlide.Shapes(PPSlide.Shapes.Count).Line.Weight = 10
PPSlide.Shapes(PPSlide.Shapes.Count).Line.ForeColor.RGB = RGB(0, 255, 0)
PPSlide.Shapes.AddLabel 1, 150, 510, 450, 28
PPSlide.Shapes(PPSlide.Shapes.Count).TextFrame.TextRange.Text = "温馨提示:欢迎提出修改建议"
PPSlide.Shapes(PPSlide.Shapes.Count).TextFrame.TextRange.Font.Color = vbWhite
PPSlide.Shapes(PPSlide.Shapes.Count).TextFrame.TextRange.Font.size = 14
PPSlide.Shapes(PPSlide.Shapes.Count).TextFrame.TextRange.ParagraphFormat.Alignment = ppAlignLeft
'==============以上为两竖线虚线============================================
InterferenceTJ PPSlide '干扰统计图表 '参数为Slide对象代表幻灯片。
word自动生成目录出现了乱码,怎么办呀???
1、因为word文档目录变回了域代码,才出现了这种word文档目录变成乱码的现象。
2、这时只要按下Alt+F9键就可以变回目录了。如果还不行,右击它(目录部分),更新域----全部,那就只有将原来的目录域全选,删掉,然后再重新插入一个目录域。
3、在word文档中,若要显示或隐藏特定域的域代码,可以单击此域或域结果,然后按下Shift+F9。 要显示或隐藏文档中所有域的域代码,可以按下Alt+F9。
PHP文件怎样生成WORD的代码
以下代码示例生成word试卷:
<?php
//初始化session
session_start();
// 包含数据库连接文件和头文件
?>
<html>
<head>
<title>试卷生成</title>
<link href="css/style.css" rel="stylesheet" type="text/css">
</head>
<?
include ('head.php');
require ('dbconnect.php');
?>
<?PHP
$juge = 0;
for ($i = 1; ($i < 100); $i++)
{
$a = $i;
if (isset($_POST[$a]))
{
if ($juge == 0)
$sql .= " id=" . $_POST[$a];
else
$sql .= " or id=" . $_POST[$a];
$juge = 1;
}
}
if ($sql != "")
{
$sql = "SELECT * FROM test WHERE" . $sql;
$result_array = array(); //返回数组
$i = 0; //数组下标
$query_result = @mysql_query($sql, $conn);
while ($row = @mysql_fetch_object($query_result))
{
$i++;
$cout .= $i . "";
$cout .= "题目难度:" . $row->difficulty . "<br>";
$cout .= "" . $row->content . "<br><br>";
} //while
?>
<?php
class word
{
function start()
{
ob_start();
print '<html xmlns:o="urn:schemas-microsoft-com:office:office"
xmlns:w="urn:schemas-microsoft-com:office:word"
xmlns="http://www.w3.org/TR/REC-html40">';
}
function save($path)
{
print "</html>";
$data = ob_get_contents();
ob_end_clean();
$this->wirtefile($path, $data);
}
function wirtefile($fn, $data)
{
$fp = fopen($fn, "wb");
fwrite($fp, $data);
fclose($fp);
}
}
/*-------word class End-------*/
$word = new word;
$word->start();
echo $cout;
$wordname = "word/" . time() . ".doc";
$word->save($wordname); //保存word并且结束.
?>
<div align="center"><a href="<?php
echo $wordname;
?>" target=_blank class="unnamed1">试卷已经生成,请点击这里查看</a>
<?PHP
} else
{
?>
</div>
<div align="center"><span class="unnamed1">您输入的条件不足,请重新输入!</span>
<?PHP
}
?>
</div>
</html>
Word怎么自动生成编号 Word自动生成编号方法
使用VBA,按Alt+F11键打开,插入一个新模块,输入代码,我只能让编号打印的时候累加,比如起始打印编号0001,打印第二张就变为0002,一直累加到9999,代码如下:
Sub普通编号()'
'
'
'
DimiAsInteger
DimdyAsInteger
OnErrorResumeNext
i=InputBox("请输入起始数","起始数",1)-1
dy=InputBox("请输入打印份数","打印份数",1)
Fordy=1TodyStep1
i=i+1
Ifi>=1000Then
Selection.TypeBackspace
Selection.TypeBackspace
Selection.TypeBackspace
Selection.TypeBackspace
Selection.TypeTextText:=i
ActiveDocument.PrintOut
Else
Ifi>=100Then
Selection.TypeBackspace
Selection.TypeBackspace
Selection.TypeBackspace
Selection.TypeBackspace
Selection.TypeTextText:="0"&i
ActiveDocument.PrintOut
Else
Ifi>=10Then
Selection.TypeBackspace
Selection.TypeBackspace
Selection.TypeBackspace
Selection.TypeBackspace
Selection.TypeTextText:="00"&i
ActiveDocument.PrintOut
Else
Selection.TypeBackspace
Selection.TypeBackspace
Selection.TypeBackspace
Selection.TypeBackspace
Selection.TypeTextText:="000"&i
ActiveDocument.PrintOut
EndIf
EndIf
EndIf
Nextdy
EndSub
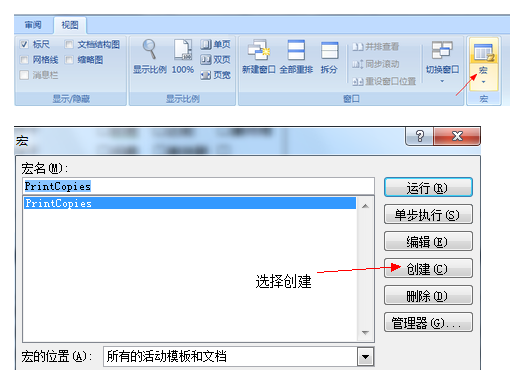
word怎么生成打印编号
第一步
首先找到Word里的宏按钮,如图。
然后,会弹出宏查看窗口,起一个名字然后选择创建,如图。
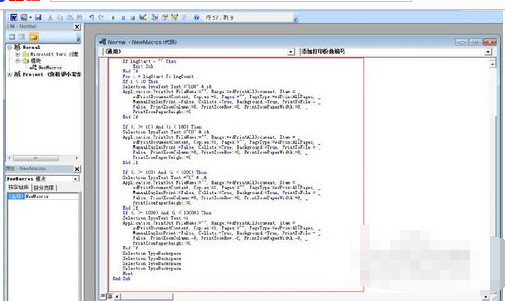
第二步
在弹出的宏录制窗口内输入宏代码,然后保存,如图。
宏代码如下:
Sub PrintCopies()
‘
‘ Macro1 Macro
‘
‘
Dim i As Long
Dim lngStart
Dim lngCount
lngCount = InputBox(“Please enter the number of copies you want to print”, “Please enter the number of copies you want to print”, 1)
If lngCount = “” Then
Exit Sub
End If
lngStart = InputBox(“Enter the starting number you want to print”, “Enter the starting number you want to print”, 1)
If lngStart = “” Then
Exit Sub
End If
For i = lngStart To lngCount
If i < 10 Then
Selection.TypeText Text:=”000″ & i&
Application.PrintOut FileName:=”", Range:=wdPrintAllDocument, Item:= _
wdPrintDocumentContent, Copies:=1, Pages:=”", PageType:=wdPrintAllPages, _
ManualDuplexPrint:=False, Collate:=True, Background:=True, PrintToFile:= _
False, PrintZoomColumn:=0, PrintZoomRow:=0, PrintZoomPaperWidth:=0, _
PrintZoomPaperHeight:=0
End If
If (i >= 10) And (i < 100) Then
Selection.TypeText Text:=”00″ & i&
Application.PrintOut FileName:=”", Range:=wdPrintAllDocument, Item:= _
wdPrintDocumentContent, Copies:=1, Pages:=”", PageType:=wdPrintAllPages, _
ManualDuplexPrint:=False, Collate:=True, Background:=True, PrintToFile:= _
False, PrintZoomColumn:=0, PrintZoomRow:=0, PrintZoomPaperWidth:=0, _
PrintZoomPaperHeight:=0
End If
If (i >= 100) And (i < 1000) Then
Selection.TypeText Text:=”0″ & i&
Application.PrintOut FileName:=”", Range:=wdPrintAllDocument, Item:= _
wdPrintDocumentContent, Copies:=1, Pages:=”", PageType:=wdPrintAllPages, _
ManualDuplexPrint:=False, Collate:=True, Background:=True, PrintToFile:= _
False, PrintZoomColumn:=0, PrintZoomRow:=0, PrintZoomPaperWidth:=0, _
PrintZoomPaperHeight:=0
End If
If (i >= 1000) And (i < 10000) Then
Selection.TypeText Text:=i
Application.PrintOut FileName:=”", Range:=wdPrintAllDocument, Item:= _
wdPrintDocumentContent, Copies:=1, Pages:=”", PageType:=wdPrintAllPages, _
ManualDuplexPrint:=False, Collate:=True, Background:=True, PrintToFile:= _
False, PrintZoomColumn:=0, PrintZoomRow:=0, PrintZoomPaperWidth:=0, _
PrintZoomPaperHeight:=0
End If
Selection.TypeBackspace
Selection.TypeBackspace
Selection.TypeBackspace
Selection.TypeBackspace
Next
End Sub
第三步
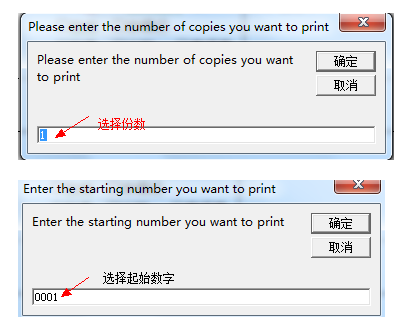
把输入光标放在你想要添加打印份数编号的地方,然后运行宏,会弹出如下窗口,第一个窗口是输入打印份数,第二个窗口是输入起始数字,如图。
转载请注明出处51数据库 » word生成代码 java代码生成word文件