
 思玥宝宝
思玥宝宝
在unity3d中开发虚拟摇杆方式有比较多,可以使用easytouch、fairygui等插件来开发。本文给大家介绍使用unity3d的原生ugui来开发出自己的虚拟摇杆,这样可以减少游戏资源包的大小。
先展示下效果图:

现在开发我们的开发
创建一个image1,并且在image1创建一个子对象image2
在image1中挂载一个自定义脚本,这里我命名为joystick
脚本代码如下
using system.collections;
using system.collections.generic;
using unityengine;
using unityengine.eventsystems;
using unityengine.ui;

public class joystick : scrollrect
{
 private float mradius;
 public system.action<recttransform> joystickmovehandle;
 public system.action<recttransform> joystickendhandle;

 protected override void start()
 {
  mradius = this.getcomponent<recttransform>().sizedelta.x * 0.5f;
  this.content.gameobject.setactive(false);
 }


 public override void ondrag(pointereventdata eventdata)
 {
  base.ondrag(eventdata);
  this.content.gameobject.setactive(true);

  //虚拟摇杆移动
  var contentpostion = this.content.anchoredposition;
  if (contentpostion.magnitude > mradius)
  {
   contentpostion = contentpostion.normalized * mradius;
   setcontentanchoredposition(contentpostion);
  }
  //旋转
  if (content.anchoredposition.y != 0)
  {
   content.eulerangles = new vector3(0, 0, vector3.angle(vector3.right, content.anchoredposition) * content.anchoredposition.y / mathf.abs(content.anchoredposition.y) - 90);
  }

 }

 private void fixedupdate()
 {
  if (this.content.gameobject.activeinhierarchy)
  {
   if (joystickmovehandle != null)
   {
    joystickmovehandle(this.content);
   }
  }
 }

 public override void onenddrag(pointereventdata eventdata)
 {
  base.onenddrag(eventdata);

  this.content.gameobject.setactive(false);

  if (joystickendhandle != null)
  {
   joystickendhandle(this.content);
  }
 }
}
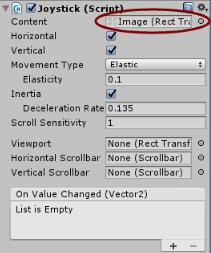
然后将image2拖动到content属性变量里
这样就可以移动并且拖动我们的虚拟摇杆了
接下来要让我们的游戏主角跟随我们的摇杆移动而移动
在我们的主角儿挂载一个自定义脚本
在start方法里添加代码:
mjoystick = gameobject.find("joystick").getcomponent<joystick>();
  mjoystick.joystickmovehandle = joystickhandle;
  mjoystick.joystickendhandle = joystickendhandle;
其中joystickhandle方法代码为:
transform.eulerangles = new vector3(0, -content.eulerangles.z, 0);
 transform.translate(vector3.forward * time.deltatime * mmovespeed);
接下来就可以运行我们的游戏,观察主角移动旋转位置。
以上就是本文的全部内容,希望对大家的学习有所帮助,也希望大家多多支持。
